About Me

My photo
I've been into dollhouse miniatures since the early 1990's now and when I realized how much I've learned during that time, I thought I'd make a blog to share my knowledge with others. I'm mostly auto-deduct, but always found help on the Internet and in specific books. The mini-world starts and ends with your own imagination, so let there be no limit. And never say : I CAN'T .... because you can, you just need to try and have the necessary know-how. And that's the main reason why I started this blog, because I wanna share what I know with newbies in the miniature world or anybody else who might be interested in sharing what I've learned so far. So, hopefully, I'll be able to provide some useful hints, tips and tricks for those of you out there just starting with this wonderful hobby

May 3, 2017

The Lavender Shop : this and that

Hello again

I just took this picture for fun, because when I saw everything standing there, I realized that I've already made quite a few items for my shop, which doesn't even exist yet, lol

Just felt like sharing
Enjoy


I made a few more candlesticks, bigger (higher) one's this time, as well as perfume bottles, vintage and other.

There are already 3 tiny displays (for the soaps, the perfumes and the ambiance fragrances)

In the front you can see a few plates I made with polymer clay and which I painted either lavender and/or gold for the occasion. The one one the right is filled with tiny lavender cakes  called "meringues" (these do really exist, taste a bit strange in the beginning but you get used to it after eating a few).

The gold plate on the left is filled with tiny little pieces of lavender "nougat" (don't know if there is another expression for that in english)

Both these plates will be on the counter at the entrance of the shop for my customers to try them before buying, lol

On the right in the back, you can see some sort of box/display for wrapping paper, all with the lavender theme and/or color of course, for the occasion

😊😊😊

Since I named this post "THIS AND THAT", the following pictures show many more items 
I made for my Lavender Shop


A basket filled with little bags of fresh lavender to put in your lingerie drawers πŸ˜‰πŸ˜‰


A cute little vintage box with a perfume bottle inside
(Lid and Perfume bottle are removable of course)


Gift wrap paper in a box and another jug


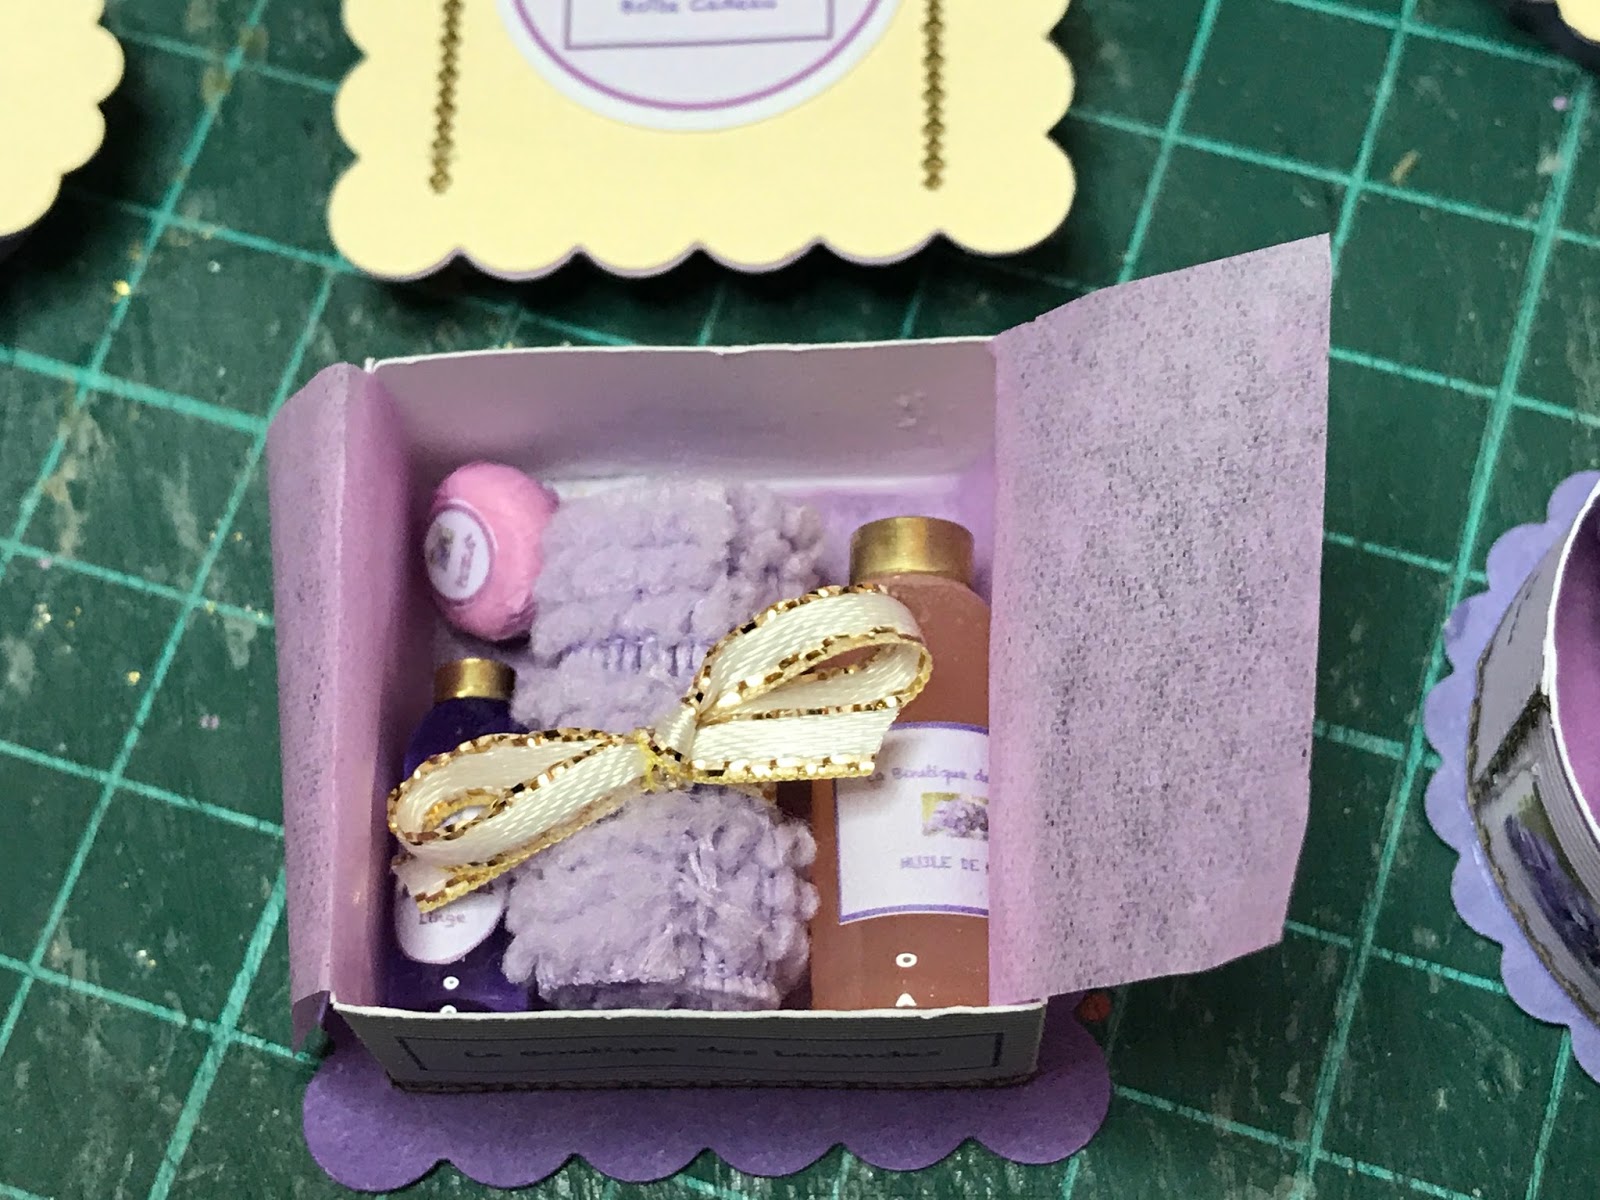
YES YES, my gift bloxes are actually filled
πŸ˜ƒπŸ˜ƒ


Meringues (is there a special word for those in english ???) 😎
which I filled into little cellophane bags
I designed 2 different labels for these, still don't know which one to chose


A basket with all sorts of testers (called "Γ©chantillons" in french)


I first made the basket (with a simple weaving technique and waxed thread) and
then I filled it with dried lavender. To make a bouquet, I filled tiny little bags made with satin paper


More jugs

Stay tuned for more

See ya soon
πŸ‘€πŸ‘€πŸ‘€

The Lavender Shop : more furniture made with cardboard

Hello and good morning everyone

😸😸😸

Since I kinda re-discovered cardboard, I'm making more furniture for my new Lavender Shop instead of buying it and it's not just cheaper, but also a lot more fun, believe me

I need a couple of shelves for my Shop and so I gave it a try after the 1st little one turned out quite nicely.

If you need measurements or so, please feel free to ask

I did use chalk paint (from Rayher, available at Amazon, but also in many craft and hobby shops). The first coat is plain lavender and with this cardboard, you usually only need 1 coat anyway to cover it all up nicely.

Once dry (which is really quick), I sanded everything to make the surface smooth before Step 2.
Then I took a piece of sponge and added some beige (also chalk paint), but I did not cover the entire surface.

To make it look "aged" or "distressed" I always use my little Distress Ink Pads, but when these are new, you gotta be careful not to use too much on the borders

Other than that, believe me, it's a piece of cake ..... 1 hour tops and you're done with the painting part. The real work here (which takes up most of the time of course) is planning the piece of furniture you wanna make.

Before you start cutting, make sure to draw some sort of plan on a piece of paper with the exact measurements and think everything through very thoroughly in order to make all the pieces fit once you start cutting out and gluying. You need to have an exact image in your head of what your shelf or any other piece of furniture you wanna make is gonna look like.

So here are a few pictures of my shelf
Enjoy

and come back soon, I'll try to make an armchair next


This is just one coat of chalk paint ..... as you can see, it's more than enough,
 you really don't need to add more coats.


I added some pieces of cardboard on the sides, just for fun

πŸ‘»πŸ‘»πŸ‘»


This is the chalk paint from Rayher I used


In these pictures, you can probably see what I meant with using a piece of sponge and not covering the entire surface with the second coat of beige paint

πŸ˜‰πŸ˜‰πŸ˜‰

And the borders are aged with the Distress


I just decorated with a few items I've already made to see what it looks like


This cute little display on top is also made with cardboard

*** UPDATE *** UPDATE ***
June 26th, 2017

I added a few pics just to show you all the furniture I made so far
I have to admit I'm a little proud of myself and I'm really really happy that I re-discovered
mat board, because it's really great to work with when making miniatures


This last pictures shows everything I have made so far for my shop
As usual, it's too much and I will need to find a really big shop for all this

A common and well know problem among us miniature makers, isn't it ?

πŸ˜€πŸ˜ŽπŸ˜‰

There's more to come, so stay tuned

See ya
πŸ‘€πŸ‘€πŸ‘€