About Me

My photo
I've been into dollhouse miniatures since the early 1990's now and when I realized how much I've learned during that time, I thought I'd make a blog to share my knowledge with others. I'm mostly auto-deduct, but always found help on the Internet and in specific books. The mini-world starts and ends with your own imagination, so let there be no limit. And never say : I CAN'T .... because you can, you just need to try and have the necessary know-how. And that's the main reason why I started this blog, because I wanna share what I know with newbies in the miniature world or anybody else who might be interested in sharing what I've learned so far. So, hopefully, I'll be able to provide some useful hints, tips and tricks for those of you out there just starting with this wonderful hobby

Search This Blog

Blog Archive

December 20, 2017

The Shabby Boutique : lights on


Hi

I just took a few random pictures of my finished Shabby Chic Boutique with the lights on.

I must say I'm really happy with these lights, so much easier to install than traditional dollhouse lights and much brighter than the battery operated one's.

I've been asked to make a tutorial for AMERICAN MINIATURIST magazine on how to install these lights in your roombox or miniature shop, so stay tuned

Don't have a date yet when it will be published, anyway I don't think I'll get to it before the holidays, so you gotta have a litte patience here, thanks

See ya
πŸ‘€πŸ‘€πŸ‘€


December 18, 2017

DIY Baskets for your dollhouse


Hi

Just wanted to share a few pics of some baskets I made
As usual, in 1:12th scale
These cute little things can be used for so many different scenes in your miniature projects

I had to make the pattern first of course, since I really didn't want to use someone else's for this project

There will be a detailed tutorial on how to make these baskets in the February issue of AMERICAN MINIATURIST MAGAZINE, so stay tuned

Here's a little preview for you to enjoy

I wish you all a Merry Xmas, enjoy the time with you loved one's

🌲🌲🌲🌲🌲


Here are 3 examples of what you can do with my little baskets

The one on the left is filled with special items for the bathroom, the red one in the middle is a Valentine's Day basket and the one one the right is shopping basket filled with groceries


DORFPUPPENHAUS : the big finale :-)


Hi my fellow followers

It's been a while that I last posted something something from the "DORFPUPPENHAUS"
You remember, that's the dollhouse that came in bits and pieces with a magazine over a time period of 2 years. Well, I stopped with issue 200 because it simply got too expensive and also there starts to be a lack of space for all the additions.

For those of you interested in this, here's my honest opinion :

PRO

* The quality of the house and the furniture is good
* Some of the accessories are a lesser quality (probably made in China) πŸ˜–
* The wood for the construction of the house comes bare and unpainted, which is a great opportunity to  paint and decorate it as you wish
* Absolutely not comparable to the DEL PRADO houses, which were really really bad in every sense of the word and far too expensive. I had them both and burned them πŸ˜–

CONTRA

* When you start buying the first few issues, they tell you that there'll be more or less 100 issues and you can choose whether you want the conservatory and/or the electrical kit with the lights ..... BUT as you go and pay 40 Euros a month for 4 issues of the magazine and parts of the house, furniture, accessories, etc (not including the folders for the magazines), suddenly there are more and more additions (garden, BBQ station, barn) and it just won't stop
* I stopped at issue 200 because I've already spend 2100 Euros of a period of time of +/- 2 years, which is far to much for a dollhouse that size
* The lights work ok, but although they have wires, they are connectod to a battery operated transformer, which I personally don't like (but that's of course just a personal note)

Nevertheless, I'm happy with the end result, so let's take a look at the latest pics I took
I'd say it us as good as finished, just need to make a work table to fit into the barn and maybe a few little things here and there, but other than that, it is DONE ..... yeah
πŸ˜€πŸ˜€πŸ˜€


As you can see in the picture above, I finally made and added the shutters
The additions I have are the conservatory on the right, the garden, the barn and the BBQ station on the left. Since I didn't have enough space to display all of them, I integrated the BBQ station, barn and garden into 1 slightly bigger part. 


I made a fence with large popsticle sticks


As you can see, even with the BBQ station, I still had enough space left to add a little garden feature


First I didn't want the barn, but then I thought : what the hell, why not :-) :-)
and it has turned out quite nicely. I altered many of the accessories, I will show you more details in a future post in my DIY section


The shingles that came with the house were simply terrible, never saw anything like it in my entire miniaturist's life .... first, they were all wavy, not a single one was straight, and I tried at least 5 different glues, there was no way they stayed on. And when they did finally sticked, both sides stood up like wings ..... arrrgh ...... I took them off (had only made 3 rows anyway) sanded the roof and used this shingle paper sheet. First try, but the end result isn't bad at all.


I added a little DIY sign to the front door ...... HOME SWEET HOME


A side view of the barn


The interior of the barn still looks a bit empty, I need to make some sort of work table to go in there


In front of the barn, I also had a little space that I did use as a garden, made some flowers and voilΓ  ... cozy little corner, don't you think


Bird's eye view of the garden in front of the barn


Although I had to shorten the garden, I managed to have enough space for a little table with chairs to enjoy a cup of coffee and I also added a little flower bed in the back


Closer view of the flower bed with the fishing garden gnome :-)

Feel free to contact me should you have any questions
email : dmzminiatures@gmail.com
or : dany4361@yahoo.com

Enjoy
See ya

πŸ‘€πŸ‘€πŸ‘€


November 23, 2017

Easy DIY items

Hi

As many of you following my blog probably already know, I've become a DIYer over the years and I really really enjoy it

With the help of YOUTUBE, PINTEREST or other BLOGS and of course my own imagination, it has become a must to no longer buy miniatures, but first try to make them myself

I mean, where's the fun in simply buying an item and place it somewhere in your dollhouse ?

Here are a few examples of what I made over the last weeks
(Text is below each pic)

NB : these are NOT tutorials, just a few quick explanations, so feel free to get in touch (email me at dmzminiatures@gmail.com) should you require more detailed information on how I make my DIY items, I’ll be happy to share

Or just wait for the tutorial, I just started to work on those and will post some from time to time

Here's the link to the 1st one I already published (it's a separate page on my blog, you'll find it on the start page at your left, scrolling down just a bit, right next to the last post.

https://danysdiyminiatures.blogspot.de/p/tutorials.html

Enjoy
πŸ‘Œ


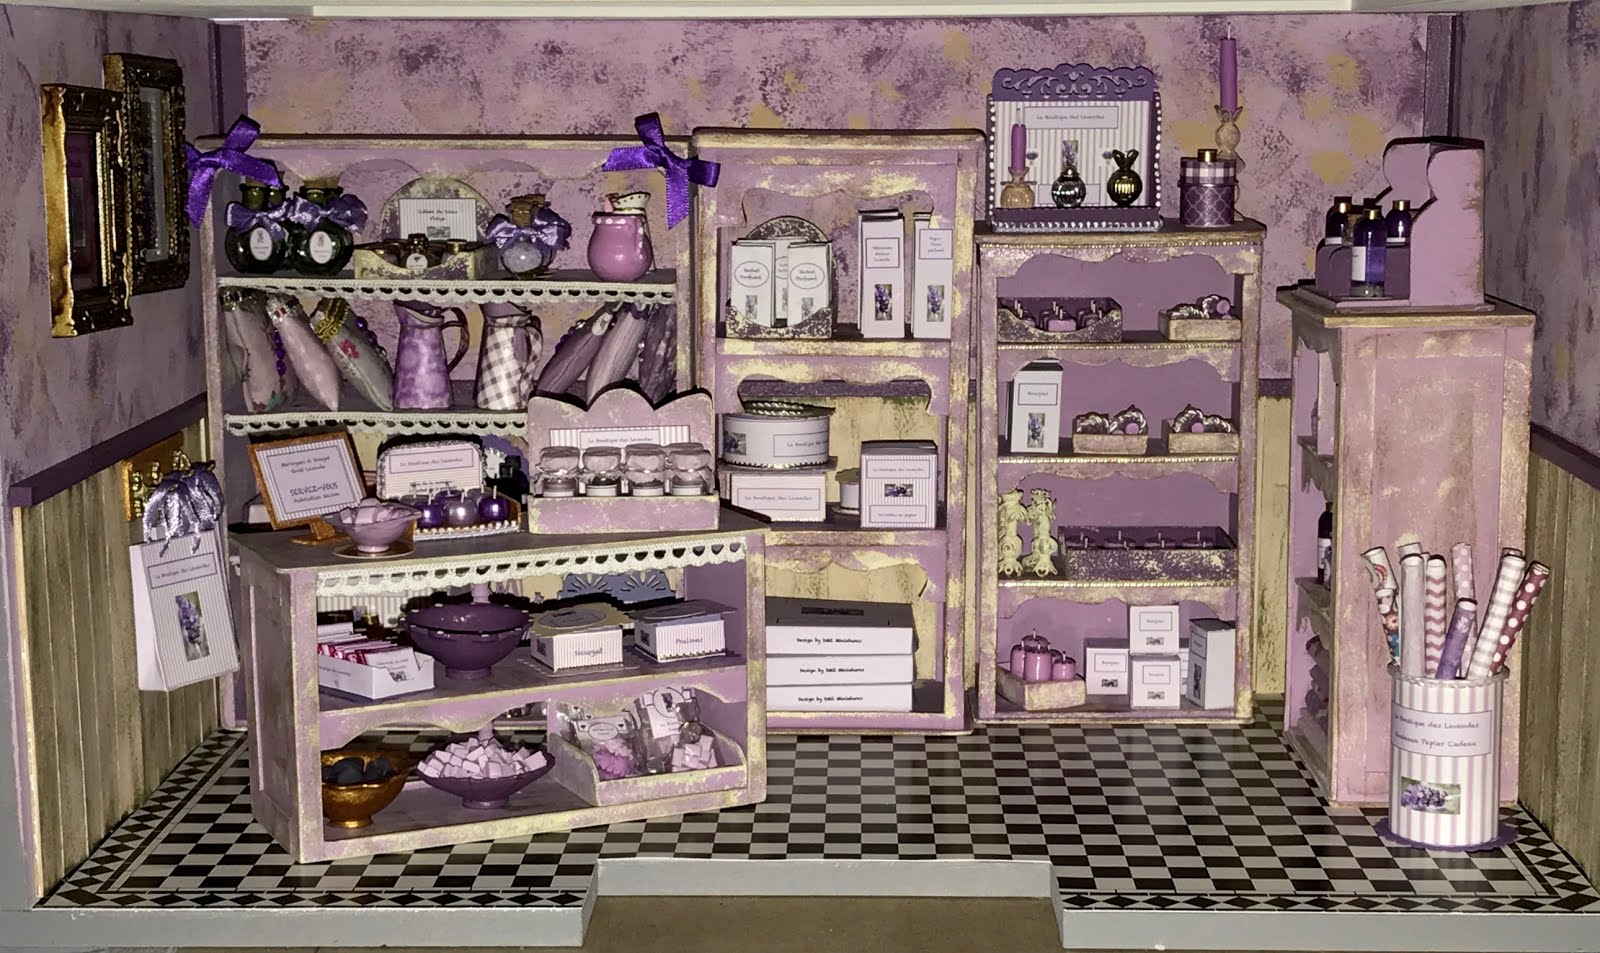
On the wall of my shabby boutique, you see a few examples of what I made myself, there's a wall clock and a couple of frames.
Frames are fairly easy to make, you can buy one and make a mold of it and them make "copies" with plaster ..... that's one method

But I will write a seperate post to show you my own method .... a bit fiddly but still easy to do


On this table, you see a few lamps I made .... I'm not really happy with the result, meaning I gotta keep working on those, but I'm retty sure they will turn out OK next time
The bowls on the lower part of the table and the jug are also DIY items


I love to add details to my furniture .... does anybody have an idea on how I made these ???

πŸ˜‰πŸ˜‰πŸ˜‰


I made the box on top, the canisters, the bottles and the tableware

Canisters are easy to make, there are different methods though
For the ones you see here, I used a pieces of wooden dowels, glued an old button on top and 
painted them. Once the paint is dry, just added a bead on top


Instead of simply painting them, you can also print out some nice paper and glue it on, 
gives quite a nice finish too


These vintage shabby looking candle holders are made with all sorts of beads, bead caps, head pins etc and just painted once the glue has dried


This basket can be made in unde 30 minutes .... the base can be either a thin piece of wood or some matboard, whatever you have in your stash. The basket itself is made with a piece of embroidery canvas. I painted it and once the paint was dry, I added some fabric to give the inside a more finished look. For the handles, you may use either braided ones, like I did, or leather strips or even some made with fabric


Another cute little shopping basket made with almost the same method
I used matboard for the base, embroidery canvas for the basket itself
This time, I left it white and just added some details with fabric, a silk rose and some rhinstones


Tiny tables made with a chesspiece (head cut off, lol) and a simple round piece of wood


I just love those vintage looking signs ..... these are simply printed on some matt photo paper (after downsizing them to 1:12th scale of course)
The frames are made with matboard, painted and aged to give them the vintage look and once dry, I just glued the signs I cut out onto the board

TIP : what I often do in order to keep the colors of everything I print out for as long as possible, I simply put some clear tape over it before cutting out


First I'd like to give you the link to Julie Warren's youtube channel, you just have to check it out


The idea for this cute little shabby looking suitcase is from one of Julie's videos
She is a very talented miniaturist and her videos are great


Maybe you have some of these battery operated Xmas light lying around somewhere ?

Well if you do, here's what you can make with those ..... light up your miniature rooms


I hope you enjoyed this post, please come back soon for more

See ya
πŸ‘€ πŸ‘€ πŸ‘€
D.


November 14, 2017

The Shabby Chic Boutique : Roof and Lights


Hello my dear followers

I've been busy working on the roof of my new shabby Boutique, since the inital roof that came with the conservatory was unfortunately unusable

Since I'm always a bit stressed when it comes to the lights in my miniature projects, I wanted to try something else here

I don't remember exactly when and where I stumbled upon this great idea .... I think it was either on PINTEREST or on YOUTUBE, but anyways, thanks to the person who posted it, because it's a great alternative to the usual lights which are not always easy to get to work and/or to install

I suppose you all know these tiny little christmas lights, the one's that are battery operated


well I used 2 of these, with 20 little lights on each one

I bought some polysterene foam board (hard and sturdy, but still easy to cut with a simple cutter tool).
The board is 3,5 mm thick

Oh, if you ever need material like that, you should check out the following online shop :


Then I traced the horizontal and vertical lines in order to know where the holes for the lights are gonna go and of course in order to have this look neat once installed.

Sand the inside of the holes a bit and put the lights in (I used a little glue to hold them in place, but please do not use any super glue or you will never ever be able to remove the lights without damaging the whole thing)

Turn around and it should look something like this


And once installed, the light in the shop is really great


And I like how my roof turned out, it's kinda nice, don't you think ?

When you're building the roof around these little lights, you need to have at least 3-4 cm height, remember that. Other than that, it's entirely up to your own imagination on what your finished roof will look like


Bye for now, be back soon

See ya
D.
πŸ‘€πŸ‘€πŸ‘€