About Me

My photo
I've been into dollhouse miniatures since the early 1990's now and when I realized how much I've learned during that time, I thought I'd make a blog to share my knowledge with others. I'm mostly auto-deduct, but always found help on the Internet and in specific books. The mini-world starts and ends with your own imagination, so let there be no limit. And never say : I CAN'T .... because you can, you just need to try and have the necessary know-how. And that's the main reason why I started this blog, because I wanna share what I know with newbies in the miniature world or anybody else who might be interested in sharing what I've learned so far. So, hopefully, I'll be able to provide some useful hints, tips and tricks for those of you out there just starting with this wonderful hobby

Search This Blog

Blog Archive

December 17, 2012

My French Bakery : Decorations, The Final Touches


Hello my miniature friends

If you have been following the entire project of my French Bakery, you'll agree we me that it is now time to think about the interior decorations, the so-called final touches

I really really love doing that in real life and in miniature. When I was younger, I wanted to become an interior decorator, hell knows why I didn't do that .... πŸ™ˆπŸ™‰πŸ™Š, but I can assure you that it is something I will regret for the rest of my life

But this post is not about me, it is about my miniatures and at least in this world, I have no regrets at all, so let's have a look at what I've done so far in terms of interior decoration and final touches


I've probably already told you that I've been a hobby miniaturist for over 20 years now and this has 1 big advantage : I do have a really really good stock of all sorts of things in my workroom.

These 2 pedestals and the matching urns were some of the things I found in my stock. And allthough they're usually used for an outdoor scence/garden project, I thought by just adding a few gold touches, they would fit nicely into my tearoom (see the 2 next pictures below)


See ..... they do look good in the tearoom 😻😻😻


I also needed a sign to let people passing by know that there is a tearoom on the 1st floor, right above me bakery. The metal plant hanger was another item I found in my stock, haha .... so I just needed to find the right sign .... which I did 

Remember to always use these signs you find on the Internet for your personal use only. 
Otherwise you might have problems with the copyright and we don't want that, don't we ?????


And here's the finished sign
πŸ‘ŒπŸ‘Œ


When I'm looking for posters, pictures to use in my miniature projects, I often browse through Websites like allposters.com, they have absolutely everything you can think of and you have a great search option to look for what you need

These two cute pictures are funny and the colors fit my walls, they show a baker at work
So just copy/paste to your computer, downsize, print on photopaper and glue to a piece of wood or cardstock and you're done


This one shows an old french shop


I put this one on top of the shelf in the tearoom to show the customers all the different sorts of coffee we're serving


Just couldn't resist filling these jars with some real coffee and real sugar

πŸ‘πŸ‘


Some DIY kitchen Towels, neatly held together with some ribbon


First I made the cake (please don't look to closely, this was my 1st try at making a wedding cake), then I had to make a cade stand and finally I had to make a display stand


Everybody has probably seen these self-adhesive letters and numbers you can buy at hobby and craft stores, they come in gold, silver, black, white etc.

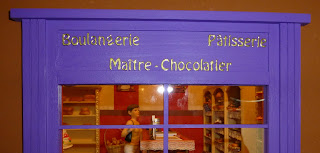
And as you can see in the pictures below, they come in very handy when you need to add the name and/or kind of your shop on the outside


I chose the name BUSIENNE, because that's the name of some of my family who used to live in Paris when I was younger .... much younger ....


A DIY sign with opening hours


A little sign that I added to the wall where the stairs lead to the tearoom
.... just for fun


I also made this board with the prices of some of the items sold in the bakery.
It's standing next to the entrance so that customers can have a look before the come in


And a second one with the list of all the breads and their prices


This one hangs on the wall, right over the counter where people can see the prices for the chocolate boxes


And another one .... just to embellish the tea room

I hope you like what I did with my bakery and I really really hope that you will be there for the grand opening

See ya
πŸ‘€πŸ‘€πŸ‘€


My French Bakery : Setting the Tables in the Tearoom


Hello

The grand opening is coming closer ... with big steps ... uuuhhhhh 
so I guess it's about time I start trying out different table settings for my tearoom
As you might remember from previous posts, I made all the tables and chairs myself as well as 99 % of the food items

But as I've been browsing through the Internet, I found this beautiful tea/coffee sets and I thought it would look really great in my tea room. So I ordered 4 of them right away and started to set the tables. And I was right, it look really really great.


I had a few friends over to give it a try .... wanted to know if the chairs are comfortable, if the tables were big enough etc.

What do you think ??


 At this point, I'm really happy that I decided to turn this cute kit into a bakery with tearoom, 
I really enjoy working on this.

Hope you like my littles tables, comments are welcome

There's more to come ... of course, so stay tuned

See ya 
πŸ‘€πŸ‘€πŸ‘€


December 10, 2012

My French Bakery : DIY Chocolate Boxes

Hi there

the Grand Opening of my French Bakery is coming closer .... ups .... I guess it's about time to make some chocolate boxes

I can't possibly sell my little chocolates in a plastic bag, now can I ???

😐😐


Before I begin with a project, I usually spend some time on the Internet trying to find ideas, patterns, vintage flower paper etc. 
I ended up finding this one here in an online scrapbook shop. 
So I copied it and printed the pattern on some matt photo paper.

The heart shape is very easy to make, either you buy a punch or just print and cut out a heart shape and use it for your project.


Don't they look yummie in their cute little heart shaped box πŸ˜„πŸ˜„


The inside of the top has a nice little design .... I don't remember if I found this on a free printable site or if I purchased it ??? hm hm, getting old I guess


Again, with my finger next to it, you get an idea of the size


As you can see, you can make square boxes, rectangles, round one's, whatever you'll need

Enjoy trying that project ..... look for free printables and go for it
(yeah, of course, you'll need to make some chocolates too)

See ya ...
πŸ‘€πŸ‘€πŸ‘€


December 8, 2012

My French Bakery : Painting the Shelves


Hi there

Now that I know that all the yummie things I'm gonna sell in my bakery, it's time to paint the shelves, don't you think πŸ‘ŒπŸ‘


This is what I started with : a naked, unfinished piece of furniture


Here's what it lookes like after painting ... I stayed with a very light mix of yellow and ochre, because the walls in my shop are already very colorful and because I want the customers to concentrate on what's gonna be IN the shelves, not their color

haha


This is what it looks like after adding a few details, gold trims, etc


and here's more or less the final result .... I painted a few plain white corner stones with gold and I'm gonna add the lace to all the compartments of course


Another idea I had was to use small pieces of the reddish wallpaper I used in the room, to give the shelves a really personal note. What do you think ?


Here's the completed and nicely filles shelf
ME BE HAPPY AGAIN πŸ˜ŠπŸ˜‹πŸ˜


And finally, these are the 2 smaller shelves I finished today
YEAH


Come back soon
See ya ...
πŸ‘€πŸ‘€πŸ‘€

December 6, 2012

DIY : Holding the Tablecloth


Hello my mini friends

You've probably all come along this particular problem that I'd like to talk about today :
using a piece of fabric as a tablecloth, you cut it nicely, even put some weight on it, and once it's on the table, it looks like a flying saucer ready to take off, it just doesn't stay down, does it ?

πŸ˜–πŸ˜–πŸ˜–

Well, here's a trick that will most certainly help you out


All you need is some starch and a few clamps to hold it together ... 
and of course something to put it on top of 

In this case I used a round piece of fabric (already cut to the right size of course, sprayed it with starch and in order to let it dry I put it on top of the bottle of starch, upside down. 

Then I put the clamps all around, as you can see in the picture and let it dry. 
Once it has dried, all you need to do is maybe add a little trim (which I will do of course ...... this was just a try) and put the entire thing on a round table or any other support that might fit.


And as you can see, it stays there .... and no longer wants to take off

See ya
πŸ‘»πŸ‘»πŸ‘»

BLOOPERS πŸ˜‚πŸ˜‚


SHIT HAPPENS !!!

This is the counter I made for my shop, filled with all sorts of cakes, tarts, cupcakes and other little sweet treats. Unfortunately, when I put it inside the shop, I realized it was far too high, a mistake that should not happen after so many years, but as you can see, it does happen and there's only one thing to do here : LAUGH πŸ˜‚πŸ˜‚


So I had to cut the bottom off, which had to be done as accurately as possible, but as you can see in the next picture, it looks OK now and the counter finally has the correct height.

So don't just throw things away when you realize you made a little mistake, because in the miniature world, many mistakes can be "undone" so to say 


See ya soon
πŸ‘€πŸ‘€

December 2, 2012

My French Bakery : Filling Glas Jars


I recently ordered these tiny glass jars (about 2 cm high) and filled them with my own fimo creations.

I think I'm gonna order some more, because they are a beautiful addition to my bakery, since it has a chocolate department :-)

I do remember when I was a child, there was this little shop just around the corner from where we lived back then and I just loved to go there, because they had these glass jars too, filled with all sorts of yummie things and I always ended up tasting at least one of them


As you can see, I added a few more of these beautiful glass jars


These jars with a removable lid are also just perfect.
I found these on Amazon, but you can also look for NailArt stuff, 
they often come in these tiny jars too

Have fun and stay tuned
See ya
πŸ‘€πŸ‘€πŸ‘€